Working with google APIs
Categorías : JavaScript, HTML, Programación, Google api.


We’ve already seen how to develop a whole web app using the "Web App Scripts".
However, many times we would like to keep our web app into another place/server, or just connect an existing web app with the google services, so in this case we must use the google APIs to interact with the google services.
We're going to split this explanation in 2 parts:
- Grant access to the APIs
- Access the API (authorization and methods to access)
The first part is common, and you would need to set it whatever type of client access you'd like to use. The second, though, can be implemented in many languages, as well as in the client or the server side. Here we're going to focus on how to implement it with javascript. Let’s see how to do it.
Grant access to the APIs
Before coding anything, we must grant the access to the APIs we’re going to use into our google account.
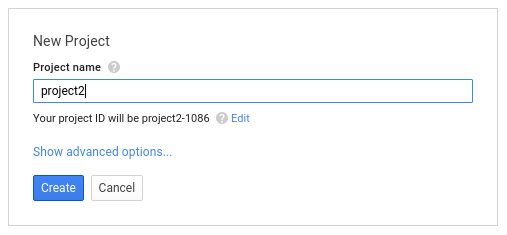
So go to your https://console.developers.google.com/ and create a new project (for instance, project2):
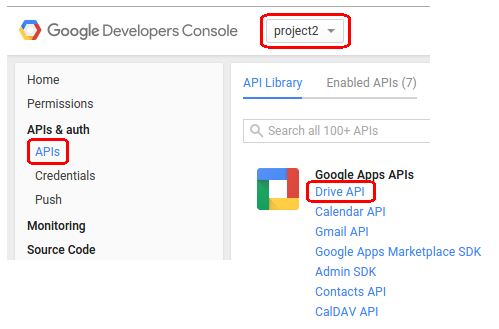
Then, go to APIs & auth → APIs option of the new Project, and there select the API you want to enable for the project. In our example it will be the Drive API :
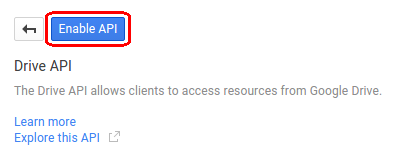
And set enable the API for the project :
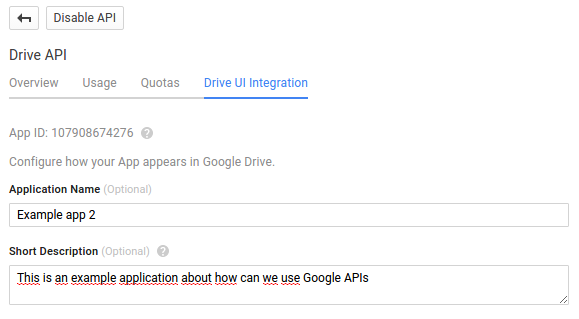
You may add more information about why your app needs to be connected into the Google Drive Service :
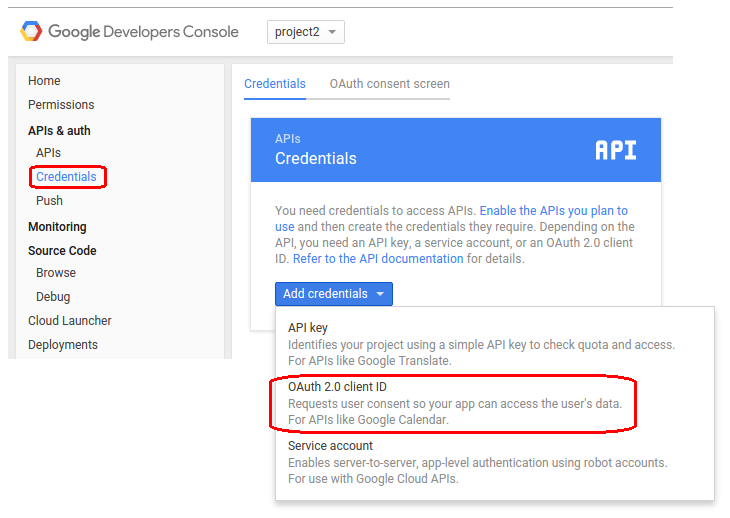
Now go to the APIs & auth → Credentials option, and add a new credential of OAuth 2.0 client ID:
There are 2 authentication methods depending on which sort of use it will be needed:
- We could launch requests to APIs which doesn’t need to access private data in the google account, and therefore it doesn’t need authorization, so we can use a simple access with gapi.client.setApiKey(API KEY).
- If we have to access private data with the APIs, we have to use the OAuth 2.0.
In the example, we’ll use the OAuth 2.0 method, so we’ll work with private data.
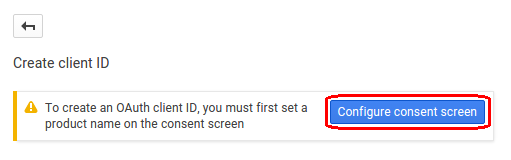
However, before creating it, you must setup the Consent Screen. This is the screen that will be shown to get the authorization when the app tries to access google API for first time. So go to set it up :
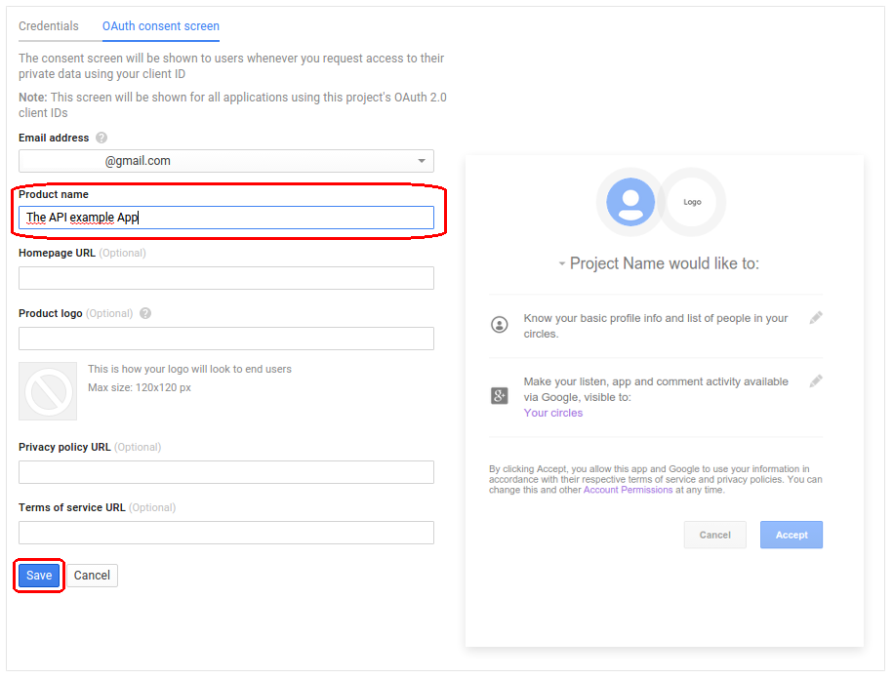
type a Product Name and save it.
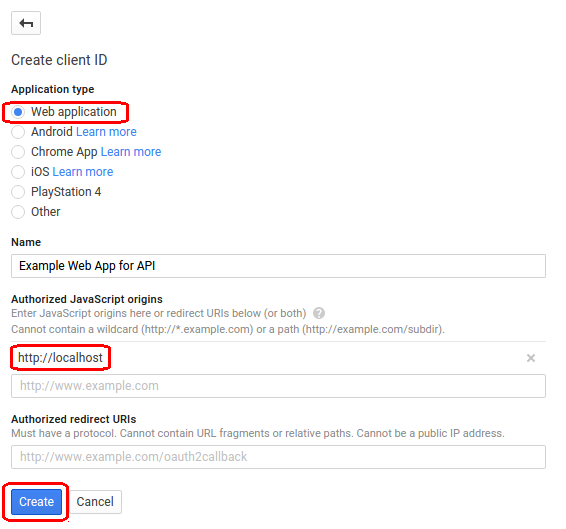
Afterwards, choose the Web application type and – for more safety – I advise to filter the origin domains where the app will access (in the example, we’ll use a local server, so we’ll access from local http://localhost) :
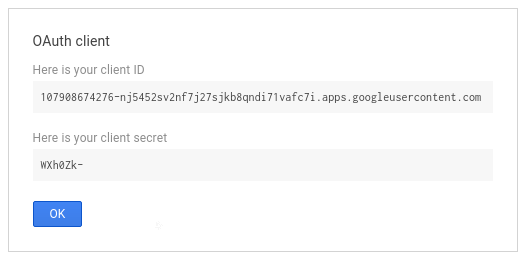
Then, you will get the Client ID and Client Secret keys. Keep your "Client ID" because we’ll need it later.
So we’ve already got it. Now we can access the services using the API.
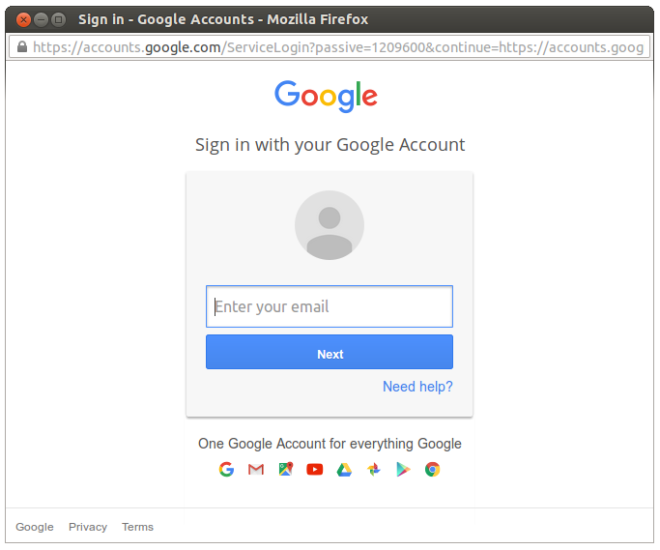
The first time you try to access to the API, if the request parameter "immediate" is false (we’ll see it later), a window screen pop up will ask you for login into google account (if you’re not yet):
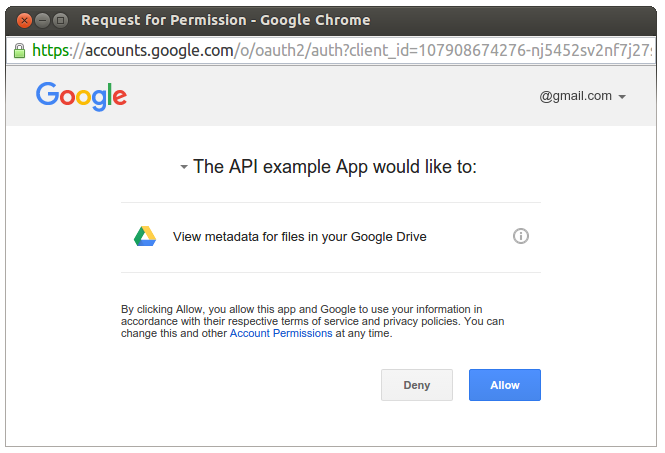
and also to allow the access to the google service:
Access the API
Now that we have the access available, let’s going to see how to use it.
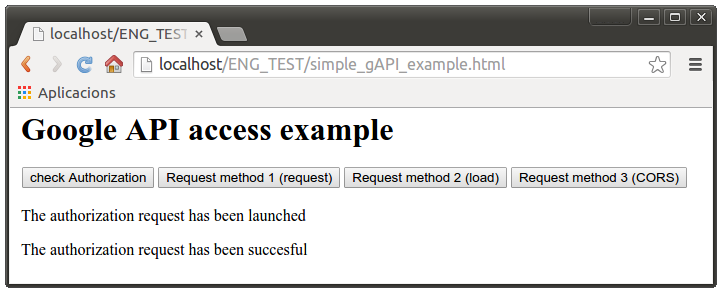
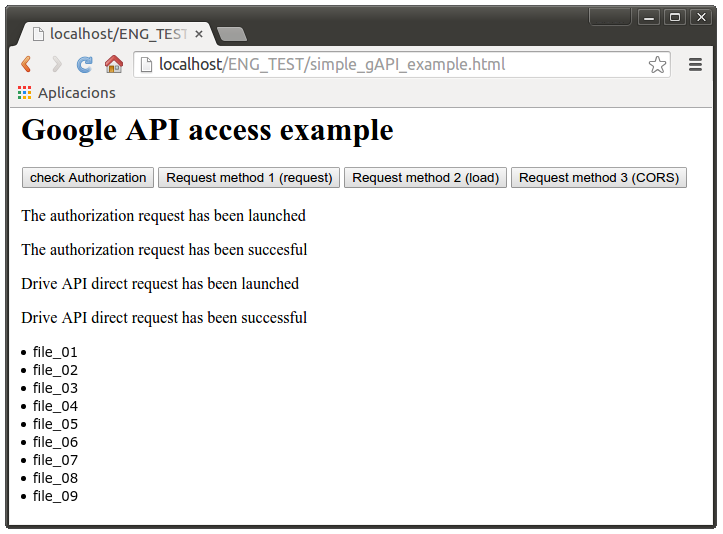
We wrote this simple html page to show an easy example:
<!DOCTYPE html><html><head><script src="https://ajax.googleapis.com/ajax/libs/jquery/1.9.1/jquery.min.js" type="text/javascript"></script><script src="https://apis.google.com/js/client.js"></script> <!-- use this for full client API --><script src="https://apis.google.com/js/auth.js"></script> <!-- use this for only CORS auth --><script type="text/javascript">var clientId = '10.........................apps.googleusercontent.com';var scopes = 'https://www.googleapis.com/auth/drive.metadata.readonly';function checkAuth() {$('body').append('<p>The authorization request has been launched</p>');gapi.auth.authorize({'client_id': clientId,'scope' : scopes,'immediate': true},handleAuthResult);}function handleAuthResult(authResult) {if (authResult && !authResult.error) {$('body').append('<p>The authorization request has been succesful</p>');$('.send_request').removeAttr('disabled');} else {$('body').append('<p>There was an ERROR!</p>');}}</script></head><body style=”width: 100%; height: 100%; overflow: hidden;”><h1> Google API access example </h1><button id=”authorize-button1″ onclick=”checkAuth();”> check Authorization </button><button class=”send_request” onclick=”method_1_request();” disabled=”true”> Request method 1 (request) </button><button class=”send_request” onclick=”method_2_request();” disabled=”true”> Request method 2 (load) </button><button class=”send_request” onclick=”method_3_request();” > Request method 3 (CORS) </button></body></html>
If you wish you can download the full example code here in this GitHub repository.
The first we need is to include the google API’s JS library into our page (https://apis.google.com/js/client.js). We’re going to launch the request with a javascript code, although there’re many other ways to do it. You can also use PHP, Java, Python, etc.. (Check it out for more info).
As you can guess, before anything the app has to authenticate the client access to the API services. In the example, as we’ve set it up before, we’ll use the OAuth 2.0. As you can see in the code, we put a button that calls a javascript function checkAuth, where we use the gapi.auth.authorize() function. This uses 2 parameters. The first parameter is an object with the following values:
- client_id: This is the ID you’ve got after setting up the google API service access. Just put the code there, or use an input parameter to set it.
- scope: Here we have to specify which scope (part of the service) we will use. Each API has many scopes, and depending on what our app wants to do, we must choose the most suitable. In the example, we’re using the "drive.metadata.readonly" scope of the Google Drive API. However we could use many others.
- immediate: This (true/false) value – as we’ve seen before – sets the app to show the authorization popup window, or not. (true = it doesn’t show the popup / false = it does show the popup).
And the second parameter, is a handler function (handleAuthResult), to be called after the request finishes, in order to handle the answer. The most common we should do here is to test the result of the request with the parameter (authRestful), and then proceed as the app needs.
If you try to execute the example, you’ll see that there’s an authorization request to the API:
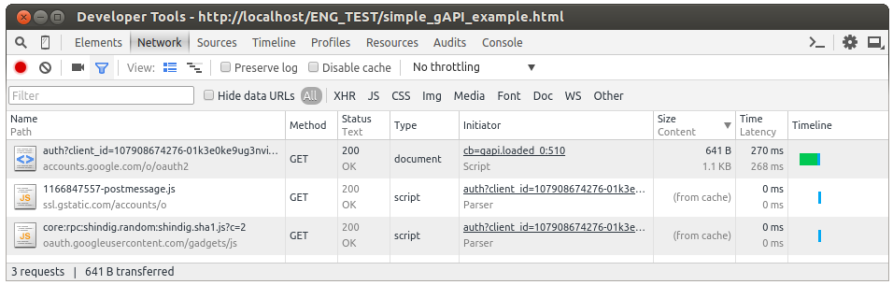
As you may know, the google API works as a RESTful method. It means that the client (javascript, or any else we’re using) and the server (google) uses a http URL structured interface to compose the messages for sending requests and responses.
You can learn more about this process there.
So, let’s see how to build and send a request. Here we have 3 different options. We can either use a simple request call (with gapi.client.request), or a faster technique, that loads previously the API interface. Even more, we can also build an XHR request (with CORS) manualy.
Method 1: gapi.client.request
The easier one. We can quickly compose a http request using the gapi.client.request function. This uses an object parameter where we must set the required values to build the request, as the "path" (in the example, we’re using the drive file list request), the "method" (GET by default for reading, although it could be POST / PUT / DELETE), "params" for specific parameters of the request, and "headers" and "body", which we’re not going to use for now.
function method_1_request() {$('body').append('<p>Drive API direct request has been launched</p>');var restRequest = gapi.client.request({'path' : 'https://www.googleapis.com/drive/v2/files','method' : 'GET','params' : {'maxResults': 10, 'q' : 'trashed=false' }});restRequest.then(function(resp) { load_result(resp.result); }, // Success functionfunction(reason) { $('body').append('<p>There was an ERROR!</p>'); }); // Error function}
After the request, as we have previously set with the restRequest.then, it will launch the response handled function (load_result if it goes ok).
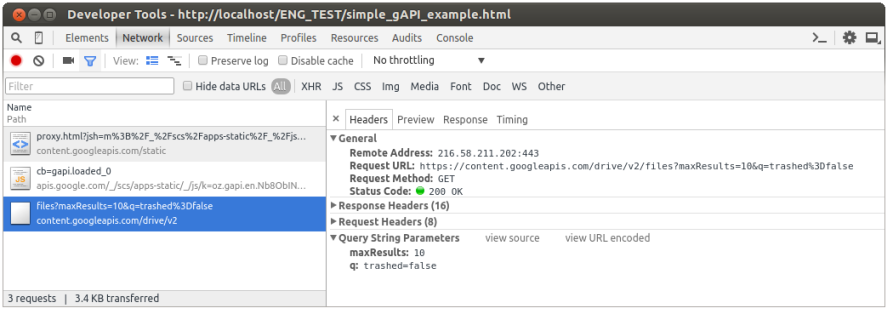
The request we’ve used for the example (drive/v2/files), as you may have already read in the documentation, asks google Drive for a metadata list of our stored files, and returns it in a JSON structure:
{"kind" : "drive#fileList","etag" : etag,"selfLink" : string,"nextPageToken" : string,"nextLink" : string,"items" : [ files Resource ]}
As an example, we could print it into the page with and easy dynamic script :
function load_result(resp) {$('body').append('<p>Drive API direct request has been successful</p>');var files = resp.items;if (files && files.length > 0) {$('body').append('<ul>');for (var i = 0; i < files.length; i++) {$('body').append('<li>' + files[i].title + ' - ' + files[i].id + '</li>');}$('body').append('</ul>');} else {$('body').append('<p>No files found.</p>');}}
And get the following result:
As you’ve seen, after pushing the button, the page launched a XHR request to talk with the API, with the URL and defined parameters:
Method 2: gapi.client.load
There’s another way to exactly do the same, though with a better performance. We could load the full client API’s interface, with the gapi.client.load() function, and use it henceforth to launch many requests. As you can imagine, it should be faster in a many requests scenario.
After loading the API interface, we can call all its available requests (for instance, those of the Drive API) through each of its functions (like gapi.client.drive.files.list). So we can manage to the same result as in the last method with the following code:
function method_2_request() {gapi.client.load('drive', 'v2',function() {$('body').append('<p>Drive API interface loaded</p>');var request = gapi.client.drive.files.list({ 'maxResults': 10, 'q' : 'trashed=false' });request.execute(load_result);});}
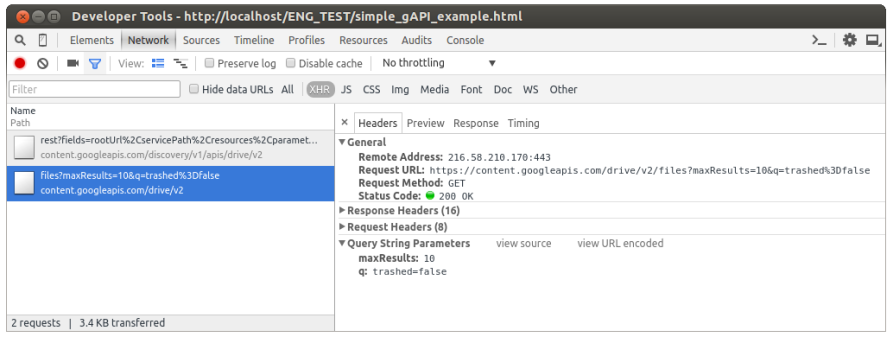
As you can see, the result is the same, and the XHR request has the same structure and parameters :
Method 3: Direct request with CORS
We have also another method to send a request to a google API: with a direct CORS request.
I recommend you this magnific tutorial to learn more about the Cross-Origin Resource Sharing (CORS).
To take it lighter, we may just load the
<script src="https://apis.google.com/js/client.js"></script> <!-- use this for full client API --><script src="https://apis.google.com/js/auth.js"></script> <!-- use this for only CORS auth -->
and then, after getting permission from the gapi.auth.authorize function, built the XHR request directly:
function method_3_request() {$('body').append('<p>Launching a manual request with CORS</p>');gapi.auth.authorize({client_id : clientId,scope : scopes,immediate : true},function() {var oauthToken = gapi.auth.getToken();var xhr = new XMLHttpRequest();var url_request = 'https://www.googleapis.com/drive/v2/files?maxResults=10';// + '&access_token=' + encodeURIComponent(oauthToken.access_token);$('body').append('<p>xhr: ' + url_request + '</p>');xhr.open('GET', url_request);xhr.setRequestHeader('Authorization', 'Bearer ' + oauthToken.access_token);xhr.onload = function() {var obj_res = JSON.parse(xhr.responseText);load_result(obj_res);};xhr.send();});}
This works in the same way as a simple XMLHttpRequest.
Nevertheless, we shouldn’t forget adding the authorization token to the request. We have 2 ways to do it:
Add the access_token parameter to the URL:
12var oauthToken = gapi.auth.getToken();var url_request = 'https://www.googleapis.com/drive/v2/files?maxResults=10' + '&access_token=' + encodeURIComponent(oauthToken.access_token);Or add it to the request’s header (with the setRequestHeader function):
12var oauthToken = gapi.auth.getToken();xhr.setRequestHeader('Authorization', 'Bearer ' + oauthToken.access_token);
There’s more info about this method right here.
Now that you know how to use the google APIs, you can make your web apps get a step further by them. There's lots of google services that could be used to improve the data sharing of your applications, as GMail, GCalendar, G+, GMaps, etc. So don't let it go, just use them and make your apps get better!